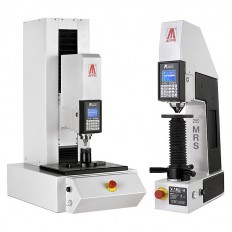
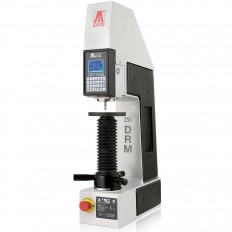
- Description
-
Details


MANUAL DRIVE & AUTOMATIC CYCLE
Just pull the START lever and the hardness tester's head moves down to make contact with the sample's surface, locking it. The hardness test cycle will automatically begin in automatic succession without breaching a phase. Within seconds results appear.CLOSED LOOP TECHNOLOGY (PAT. AFFRI)
Load forces are generated by a dynamometric load cell which assures long term accuracy and eliminates problems associated with dead weight systems on traditional testers. Results are not affected by any structural deflection, misalignment or vibration.

REPEATABILITY & REPRODUCIBILITY
Accurate measurements on the first test, even in extreme conditions, will eliminate the need for repeated tests. The R&R data is at the top of its class.INDENTER STROKE
When testing unstable samples or deflecting parts, the AFFRI System will follow the sample without losing contact thanks to its 50 mm stroke for indenter and clamping hood. Easy and fast hardness measurements on pieces with different thicknesses without acting on tester head or elevating screw.

CLAMPING SYSTEM (PAT. AFFRI)
Secure contact with the specimen is always maintained, even in the unlikely event of any specimen movement during the operation cycle. The clamping system assures perfect stability of any test piece throughout the test cycle, even if it's oiled, rusty or dirty.MOVABLE TESTING HEAD
Total of 700 mm of vertical stroke. The moving tester's head permits easy measurements on large pieces, reaching points at the top of the sample that would be difficult to be measured with common testers.

LARGE BASE
The 330 RSD’s wide work table base is capable of bearing masses beyond 1000 kg which allows for steady hardness measurements on bulky or irregular pieces It also offers a comfortable working base for small pieces.ELEVATING WORKING BASE
Vertically sliding chromed work table capable of bearing masses up to 2000 kg which allows for steady hardness measurements on bulky or irregular pieces. It is possible to install different types of piece holder anvils: from large plane tables to V shaped anvils or special solutions for irregular specimens.

SOFTWARE
The pre-installed software controls the whole instrument during the entire cycle avoiding operator errors. Powerful analysis system with easy and fast test settings, live statistics and graph. Data and test sessions storage.Large LCD display 128x64 pixels. Touch key pad board with IP 64 protection.TABLE FOR RING SHAPE SAMPLE (OPTIONAL)
Optional interchangeable base for hardness testing on external ring shape tubes, cylindrical surfaces and various samples diameter.

OPTICAL SYSTEM (OPTIONAL)
BRINELL AND VICKERS (ISO 6506 - 6507 / ASTM E10 - E384)
Rotating arm with self-alignment of the optic with the indentation axis: Automatic centering with no need to move the specimen, Interchangeable objectives, Camera USB 2.0 - 1.2 megapixel. Software for Vickers, Knoop and Brinell indentation reading: Automatic and manual measure, zoom, focus signal, trace CHD case depth diagram, statistic, create test report, memory of image.L.I.S.A. (OPTIONAL)
Laser pointing system (Pat. AFFRI).
Allows for a precise test position pointing before the contact between the indenter and the sample. Excellent solution for gear teeth and blades and cutting tools edges.TECHNICAL SPECIFICATION
MODEL206 RSD / RS-SD 330 RSD / RS-SD 903 RSD / RS-SD
StandardsEN-ISO 6506-2 / EN-ISO 6507-2 / EN-ISO 6508-2 / ASTM E-18 / ASTM E-10 / ASTM E384/ JIS
X-Y Table---- 330x390 mm
Indenter and clamping-hood stroke0/50 mm
Vertical head stroke---- 0/300 mm 0/700 mm
Elevating screw stroke0/215 mm ----
Depth capacity190 mm
Preload
RSD: 98,1 N (10 kgf)
RS-SD: 29,4 (3 kgf)Force range
RSD
Rockwell: 588.4 - 980.7 - 1471 N (60 - 100 - 150 kgf)
Vickers (Only indentation): 98.07 - 980.7 N (10 - 100 kgf)
Brinell (On request): 98.07 - 612.9 - 1226 - 1839 N - On request 2452 N (10 - 62.5 - 125 - 187.5 kgf - On request 250 kgf)
RS-SD
Superficial Rockwell: 147.1 - 294.2 - 441.3 N (15 - 30 - 45 kgf)
Vickers (Only indentation): 29.42 - 294.2 N (3 - 30)
Brinell (On request): 153.2 - 294.2 - 306.5 N (15.6 - 30 - 31.2 kgf)Feasible tests
RSD
Rockwell: HRC - HRA - HRD - HRB - HRF - HRG - HRL - HRM - HRR
Vickers (Only indentation): HV10 - HV100
Brinell (On request): HB30 - HB10 - HB5 MPa (F/D2)
RS-SD
Superficial Rockwell: HRN - HRT
Vickers (Only indentation): HV3 - HV30
Brinell (On request): HB30 - HB10 - HB5 MPa (F/D2)
Load accuracyBetter than 0.5 % - Reviews
-
Feature


