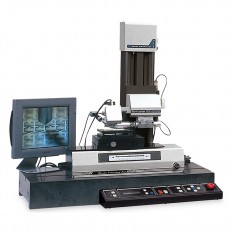
- Description
-
Details
2D SURFACE ROUGHNESS MEASUREMENT
ModelSE800 Pick-up
(PU-DJ2S-60)
Detection methodDifferential Transformer
Measuring Range600 µm
Accuracy≤ ± 3%
Resolution0.04 – 10 nm
Straightness0.2 μm/100mm or Less
Measuring Force0.75 mN
StylusDiamond, Tip radius: 2 μm ±25%, angle 60° Skid
Curvature radius: 40 mm (measuring direction), SapphireDrive unit
Drive range100 mm
Accuracy± (1+0.02L) μm, L = Measuring Length (mm)
Scale resolution0.01 μm
Measuring speed0.02, 0.05, 0.1, 0.2, 0.5, 1.0, 2.0, 3.0 mm/s Driving speed
0.5, 30 mm/s (by remote controller), 80 mm/s (Selectable during macro measurement)
Drive motion operationRemote controller switch
Dimensions / WeightW385 × D130 × H140 mm / 9 kg Motorized column
Vertical motion range300 mm (equipped with manual fine adjust)
Vertical motion limitOperating range can be set by software Vertical motion speed
0.05 - 50 mm/s
10, 50 mm/s (by remote controller, Up)
5, 30 mm/s (by remote controller, Down)
Vertical motion operationRemote controller switch
Auto-stop accuracy±0.2 µm (Using skid, vertical magnification set at100,000 times) Dimensions / Weight
W 650 × D 335 × H 774 mm / 75 kg
Maximum load70 kg
Depth from pick-up105 mm
Bed materialGabbro
Installation areaW1580 x D800 mm
Power SupplySingle Phase AC90V-240V, 50/60Hz, 200VA Analysis items
1) JIS B06011982 - Ra, Rmax, Rz
2) JIS B06011994 - Ra, Ry, Rz, S, Sm, tp
3) JIS B0610-1987 - Wca, Wcm, Wem, Wea
4) JIS B0601-2013 (JIS B0601-2001, ISO 42871997) - Pp, Pv, Pz, Pc, Pt, Pa, Pq, Psk, Pku, PPc, PSm, PΔq, Pmr(c), Pδc, Pmr, Rp, Rv, Rz, Rc, Rt, Ra, Rq, Rsk, Rku, RPc, RSm, RΔq, Rmr(c), Rδc, Rmr, Wp, Wv, Wz, Wc, Wt, Wa, Wq, Wsk, Wku, WPc, WSm, WΔq, Wmr(c),Wδc, Wmr
5) JIS B0631-2000 - AR, R, Rx, Rke, Rpke, Rvke
6) JIS B0671-1, -2, -3, -2002 (ISO 13565-1, -2, -3, -1996) - Rk, Rpk, Rvk, Mr1, Mr2, Rpq, Rvq, Rmq
7) ISO 12085, 1996 - AR, R, Rx, Rke, Rpke, Rvke
8) ASME B46.1・11995 - Ra, Rq, Rt, Rp, Rv, Sm, Pc, Rsk, Rku, tp, HSC,Δq,Δa, Rmax, Rz, Rpm, λa, λq, Wt, Wa, Wq, Wp, Wv, Wmr(c)
3D SURFACE ROUGHNESS MEASUREMENT (OPTIONAL)
Motorized stage (RAF-22D)
Dimensions of stage150 × 150 mm
Leveling range±1°(X,Y)
Motion range of the stage50 mm
Minimum stepping range1 µm
Maximum load5 kg
Dimensions / WeightW312 × D150 × H70 mm / 8 kg Analysis items
Flat map - Direct contour map, Monochrome contour map,Differential contour map
Bird’ s eye view - Scan display, Halftone dot meshing display,Contour display, Differential scatter display
3D parameter - SRp, SRv, SRmax, Sra, SGr, SSr, SRz, SRq, SRsk, SΔa, Sλa, Spc
Particle analysis - Histogram of Peak (Valley) Number of particle (1 level mode), Density of particle, Average of square, Average of Volume, Average of diameter (Plural level mode),Each graphic display and the list of values
Graph - FFT, BC
NON-CONTACT ROUGHNESS MEASUREMENT (OPTIONAL)
■ It does not damage the sample by non-contact measurement
■ High speed measurement is possible, since there is no moving parts in the sensor
■ It can measure low reflectivity sample, since laser power can be changed in 20 steps.
■ This sensor is not necessary to manually focus, since the sensor is focused automatically by Auto-Stop function
■ Surface roughness measurement of the Inside of the pipe by a non-contact detector was difficult until now But this sensor is able to measure it by compact optical design
Crispy PU-OS501W
Mode
PrecisionWide range AF
Measuring range12 μm 30 μm 30 - 50 μm
Resolution0.2 nm 0.5 nm 0.5 nm
Diameter of spotApprox. 1 - 10 μm Approx. 1 - 25 μm Approx. 1 μm
Accuracy1% + 0.03 μm 1% + 0.2 μm 1%+0.1 μm
Repeatability10 nm 20 nm
Reflectance4% or more
Measurable angle X-axis± 25°
Measurable angle Y-axis± 5°
W.D.1.5 mm Laser
Class1 (JIS C 6802:2011), 635 nm, 2mWMass
Approx. 250 g - Reviews
-
Feature


