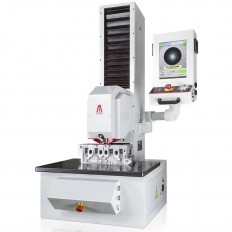
- Description
-
Details
CONFORMS TO: ISO 6508 - ASTM E18 / ISO 6506 - ASTM E10 / ISO 6507 - ASTM E384
LD 3000 AF meets all the worldwide rigorous hardness testing standards
EASY AND FAST AUTOMATIC MEASUREMENTS
Spin the leveling screw’s handle and bring your sample to make contact with the clamping hood blocking the piece. Press the START button and the measuring head approaches the sample, applies the load to perform the indentation and goes back upward; all in automatic succession without breaching a phase. Direct auto-reading of Rockwell, Superficial-Rockwell, Brinell HBT and Vickers (only indentation).
ADVANTAGES:
• Non-destructive CHD test
• No need to prepare the sample or to separate materials types
• Reduce testing costs up to 70% compared to traditional polished cross section as Vickers method
• No need for sample preparation equipment and consumable supplies
• Increase your product quality, 100% inspection testing on production floor department
• Reduce your testing time by 90%, just 60 seconds analysis time
• Not only CHD! LD3000AF is a universal hardness tester for Rockwell, Superficial-Rockwell, Brinell HBT and Vickers (only indentation)
LD 3000 AF WILL DETERMINE THE CASE HARDNESS DEPTH (CHD), WITH GREAT PRECISION AND MINIMAL OPERATOR INTERVENTION.
Testing can be performed on a non-metallographic prepared specimen. The system will determine the superficial hardness and its effective depth (CHD), from 0.12 to 2 mm, without destroying the specimen and testing rather than random sampling of manufactured products. Great precision and minimal operator intervention on finished products: there’s
no need for sample preparation, no need to separate material types or to polish the cross section as Vickers method. In just one minute the tester generates the report with the CHD graph.
HTDTL software version, supplies the Hardness and hardness depth values at HV2 525-550-600-650. The HTDTL Plus version in addition, offers the complete report and graph, assisting in displaying the complete sample decarbonized zone.
LD3000AF performs every hardness scale for universal use in your own laboratory.
CLOSED LOOP TECHNOLOGY (PAT. AFFRI)
The force by load cell and the closed loop AFFRI system assures absolute accuracy on all test conditions. Closed Loop load cells manage load forces, which are automatically programmed and controlled at each test assuring perfect linearity in every range eliminating the problems associated with dead weight systems on traditional testers. Results are not affected by any structural deflection, misalignment or vibration. The system can also operate in an inclined position.

EASY & FAST AUTOMATIC MEASUREMENT
Spin the leveling screw handle until the sample makes contact with the clamping hood blocking the piece. Press the START button and the measuring head will approach the specimen, apply the load to perform the indentation and goes back upward; all in automatic succession without breaching a phase. When testing unstable samples or deflective parts, the AFFRI System will follow the sample and not lose contact, compensating any frame deflection during the test cycle. Accurate results are assured even with oiled, dusty or dirty pieces.
SELF COMPENSATING AND CLAMPING SYSTEM (Pat. AFFRI)
When testing unstable samples or deflective parts, the AFFRI System will follow the sample and not lose contact, compensating any frame deflection during the test cycle. Accurate results are assured even with oiled, dusty or dirty pieces. The indenter head retracts into a protective
cylinder at the end of the measurement cycle. Total indenter head travel of 30mm max. With a total sample height accommodation of 300mm.
TECHNICAL FEATURE
MODELLD3000 AF
StandardsEN-ISO 6508 / EN-ISO 14577 / ASTM E-18 / ASTM E-384
Indenter and clamping-hood stroke30 mm
Elevating screw stroke150 mm
Depth capacity190 mm Test loads
Vickers: 98.07 - 147.1 - 294.2 - 490.35 - 980.7 N (10 - 15 - 30 - 50 - 100 kgf)
Brinell: 98.07 - 153.2 - 294.2 - 306.5 - 612.9 - 1839 - 2450 - 4900 - 7350 - 9807 N (29403 N on request)
(10 - 15.6 - 30 - 31.2 - 62.5 - 187.5 - 250 - 500 - 750 - 1000 kgf) (3000 kgf on request)
Rockwell: 588.4 - 980.7 - 1471 N (60 - 100 - 150 kgf)
Superficial Rockwell: 147.1 - 294.2 - 441.3 N (15 - 30 - 45 kgf)Feasible tests
HDTL con curva CHD: 525 - 550 - 600 - 650 (More on request)
Vickers: HV10 - HV15 - HV30 - HV50 - HV100
Brinell HBWT: HB30 - HB10 - HB5 - HB2.5 MPa (F/D2)
Rockwell: HRA - HRB - HRC - HRD - HRE - HRF - HRG - HRH - HRK
Superficial Rockwell: HRN - HRT
AccuracyBetter than 0.05 % - Reviews
-
Feature


