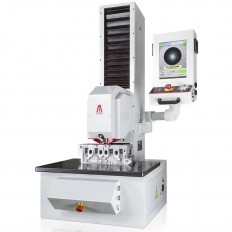
- Description
-
Details


MOTORIZED TURRET
Horizontally rotating turret with four slots for magnification lenses and two for indenters. All optical microscope objectives can be pre-installed and combined with indenters for every Vickers and Knoop hardness scales.CLOSED LOOP TECHNOLOGY (PAT. AFFRI)
Load forces are applied through load cells and controlled in "Closed Loop" with a frequency of 1 khz, assuring perfect linearity in every range. Results are not affected by any structural deflection, misalignment, vibration or problems associated with dead weight systems on traditional testers

MOTORIZED HEAD AND AUTOMATIC TEST CYCLE
The measuring head approaches the specimen and begins the test, following every predefined pattern and performing each indentation, no matter the amount. Results are listed along with the corresponding indentation image, statistics and CHD charts.X-Y MOTORIZED TABLE
With an accuracy of +/- 0.5 μm steps, reference points for patterns indentations can be positioned precisely where they are required. The table allows automatic multi-indentation test cycles on multiple samples with perfect positioning on the entire area.

INDENTER STROKE
WIKI JS can perform reliable tests even on multilevel or misaligned sample surfaces.AUTOFOCUS AND IMAGE CLEANING
hading correction and DC regulated light source, reproducible results are obtained regardless of the number of indents measured. From perfectly polished to rough and etched samples, the auto-detection capabilities of WIKI JS allow measurements on a variety of sample surfaces.
SOFTWARE
(1) High definition monitor 24”
(2) Clear view of the indentation with autofocus and auto cleaning of the surface’s image
(3) Get a real and detailed image of the sample and place patterns where you need to perform the case depth indentations
(4) See a list of each sample and each pattern. Save or import traverses, edit, move, copy and paste
Control the whole instrument with the mouse including dynamic movements on X/Y/Z axis at fast or slow speed. Accuracy of 0.5 μ/m per stepAUTOMATIC CHD MEASUREMENT CYCLE ON MULTIPLE SAMPLES
Auto focusing, automatic measuring and reporting, allows this system to function unattended for hours without interruption, saving time and money, thus increasing output and productivity.

1 SEE THE FULL AREA
Obtain a perfect, detailed, high resolution, and evenly illuminated view of the whole sample holder.2 SET UP PATTERNS
Save, copy and paste or create new patterns to predefined locations with a simple click.

3 PUSH START
The software follows the patterns, indents the sample, measures, and generates data dynamically.4 GET RESULTS
Obtain statistically relevant results. Review results in graphical and/or tabular format. Export and print.
TECHNICAL FEATURE
MODELWIKI 100 JS WIKI 100 JS3 Standards
DIN-EN-ISO 6506 / DIN-EN-ISO 6507 / DIN-EN-ISO 4545 / ASTM E-92 / ASTM E-384 / JIS B 7734X/Y table
WIKI 100 JS/JS3: Manual - 100x100 mm with 10 μm step
Option: Motorized - 100x50 mm or 200x100 mm with 0,5 μm step
Vertical head stroke0/300 mm Motorized
Depth capacity135 mm Indent reading
WIKI 100 JS/JS3: Manual focus with automatic readingForce range
0.09807 - 0.1471- 0.1961 - 0.2452 - 0.4903 - 0.9807 - 1.961 - 2.942 - 4.903 - 9.807 - 19.61 - 29.42 - 49.03 - 98.07 N
(0.01 - 0.015 - 0.02 - 0.025 - 0.05 - 0.1 - 0.2 - 0.3 - 0.5 - 1 - 2 - 3 - 5 - 10 kgf)
As optional:
From 0.0098 to 0.09807 N (1 gf to 10 gf)
From 98.1 to 490.3 N (10 to 50 kgf)
From 490.3 to 980.7 N (50 to 100 kgf)0.9807 - 1.961 - 2.942 - 4.903 - 9.807 - 19.61 - 29.42 - 49.03 - 98.07 - 196.1 - 294.2 N
(0.1 - 0.2 - 0.3 - 0.5 - 1 - 2 - 3 - 5 - 10 - 20 - 30 kgf)
As optional:
Superficial Rockwell 147.1 and 294.2 N (15 and 30 kgf)
Brinell 306.5 N (31.25 kgf)Feasible tests VickersOn request Knoop and Brinell
VickersOn request Knoop, Superficial Rockwell and Brinell
AccuracyBetter than 0.05 % - Reviews
-
Feature


