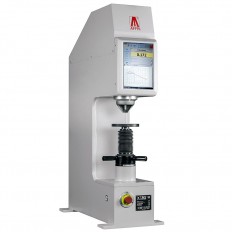
AFFRI Hardness Tester ATI V-AUTO

AFFRI Hardness Tester ATI V-AUTO

฿0.00

Wireless and compact hardness tester for Vickers and micro Vickers tests with built-in image viewing. Fully automatic hardness tester in CNC system.

Brand AFFRI
OR
Description

Details

ATI V-AUTO is an Automatic Vickers, micro Vickers and Knoop Hardness Tester, engineered to meet the rigorous standards set forth by ASTM E92 and E384. This advanced testing instrument employs a high-precision load cell and Closed-Loop electronic control with a 1 KHz sampling rate, ensuring optimal accuracy and reliability. One START button to get start the entire test cycle with display of the results. Fully automatic test cycle with automatic succession of each phase without interruption. Direct image of indentation with manual or automatic measuring on-board. Turret at 5 positions with automatic selection of indenters and objective lens, depending on the selected scale. ATI V-AUTO is equipped with a motorized X-Y-Z table and auto-focus for multi indentation cycle.

Automatic multi positions turret

ATI V-AUTO is equipped with a motorized X-Y table and auto-focus for multi indentation cycle. ATI V-AUTO is equipped with a automatic turret at 5 positions (3 steps for objective lens and 2 steps for indenters) with automatic selection of indenters and objective lens, depending on the selected scale. Interactive zoom from 15X to 800X for each lens. ATI V-AUTO has the automatic specimen scanning function: with this function, our Vickers hardness tester creates a precise mapping of the specimen through automatic scanning of the sample profile and through automatic recognition of different materials that compose it (external resin and metal material). This is the solution in case of multiple indentation paths in automatic test cycle to determine the effective depth of hardness. It is possible to create patterns with the desired geometries.

Software

The advanced hardness testing system is equipped with an automatic specimen scanning and multi indentation cycles. The scanning function creates a precise mapping of the specimen through automatic scanning of the sample profile and through automatic recognition of different materials that compose it (external resin and metal material). Multiple indentation paths in automatic cycle to determine the effective depth of hardness. It is possible to create patterns with the desired geometries. The CHD diagram appears directly on the display at the end of the cycle with the results.

Main Features

- One START button to get start the entire test cycle with display of the result without operator intervention.
- Fully automatic test cycle with automatic succession of each phase without interruption.
- Load forces controlled electronically in “Closed-Loop” .
- Direct image of indentation with manual or automatic measuring on-board.
- Turret at 5 positions with automatic selection of lens-indenters depending on the selected scale.
- Interactive magnification from x15 to x800 for each lens.
- Memory for data and image storage.
- Creation of statistical graphs and technical reports.
- 11.5” ultra HD display with touch screen and digital keyboard.
- 1,3 Mp camers SHD.
- Software with interface Windows and 10.2 GM of memory.
- Ethernet and USB connection for data export and remote control.
- Remote control for self-diagnosis and software update service.
- Suitable for all laboratory and production environments.

TECHNICAL FEATURE


MODEL

ATI V

Compliance standards

ASTM E92 and E384
Range force ATIV 1

10 – 25 – 50 – 100 – 200 – 300 – 500 – 1000 gr
(0,098 – 0.24 – 0.49 – 0.98 – 1.96 – 2.94 – 4.90 – 9.8 N)


Range force ATIV 10


200 – 300 – 500 gr ; 1- 2 – 5 – 10 Kg
(1.96 – 2.94 – 4.90 – 9,8 – 19.6 – 49.03 – 98.06 N)

Range force ATIV 30
300 – 500 gr ; 1- 2 – 5 – 10 – 30 Kg
(2.94 – 4.90 – 9,8 – 19.6 – 49.03 – 98.06 – 294.19 N)

Range force ATIV 50
300 – 500 gr ; 1 – 2 – 5 – 10 – 30 – 50 Kg
(2.94 – 4.90 – 9,8 – 19.6 – 49.03 – 98.06 – 294.19 – 490.33 N)


Force control system

Electronic control of load cells in “Closed-Loop”
Dwell time
1 - 99 seconds

Resolution
0.001 mm


Objectives

1X and 2X with a field of view of 8mm x 16mm
Auto-focus
Automatic (just for ATIV AUTO)


Optical magnification

H20X , 40X (as optional 5X and 10X)
Max height of test piece
210 mm (without XY table)


Depth capacity of throat

 135 mm
X-Y table

ATIV: manual table ; ATIV AUTO: motorized table ;
Art. A055.0.010 travel 50x50mm, Art. A055.0.008 travel 100x100mm


Display

11,5” UHD dislay with multicolor touch screen

Camera

1,3 MP UHD
Data store
2 GB


Principle of operation

Windows 10

Data output

USB

Power supply

 220V, 50Hz / 60Hz

Total dimensions

 900 x 900 x 1000 mm
Reviews
5 star
0
4 star
0
3 star
0
2 star
0
1 star
0

Image

Feature

Upsell products