- Description
-
Details


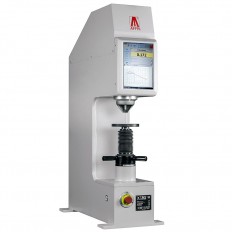
MOTORIZED TURRET
Horizontally rotating turret with four slots for magnification lenses and two for indenters. All optical microscope objectives can be pre-installed and combined with indenters for every Vickers and Knoop hardness scales.AUTOMATIC READING
Automatic indentation reading through camera. To make the test just place the specimen under position, push the start button: the hardness tester will make the contact, apply the test force, switch to the objective, measure the indent and give the result.CLOSED LOOP (PAT. AFFRI)
Load forces are applied through load cells and controlled in "Closed Loop" with a frequency of 1 khz, assuring perfect linearity in every range. Results are not affected by misalignment or problems associated with dead weight systems on traditional testers


XY STAGE
Manual XY table 100x100mm with 10 μm step. This table is a perfect solution for manual CHD case depth tests and can be provided with digital micrometers for automatic CHD graph generation.PRECISE FOCUSING
The ergonomic and handly wheel on the tester side controls the Z stroke. It allows precise focus adjustmens as well as fast movements.LIFTING SYSTEM
The vertically sliding chromed spindle is a perfectly steble support for the specimen. It is possible to install different types of pieceholder anvils.
- High definition monitor 24”
- Clear view of the indentation and the testing zone
- Direct conversion in HR, HB, HK and other scales
- Visual control of all results and live statistics
- Print results from template or save / import test cycles from archive
- Customizable test report with customer logo, specimen information, statistics and graphs
- Control the whole instrument with the mouse
The AFFRI Vickers measuring software has been studied to fulfill any client need and to be accessible to every operator. This is a “SMART SOFTWARE” which results extremely easy to be used and can be customized to display only needed testing procedures.


AUTOMATIC READING
Vickers, Knoop and Brinell measurements with the same hardness testing machine. From perfectly polished to rough & etched samples, the software will automatically measure indents on any sample surface.AUTOMATIC ILLUMINATION
Automatic light regulation on dark, opaque or polished samples. The hardness tester controls and adjusts the light and contrast to find the right combination and measure the indent. Just place the specimen and click the illumination button to see the change.TEST REPORT
Customizable test report with client logo and information. Put as many sample information as you need, including pictures of the indents and test area. Examine results, statistics and CHD diagram. Results can be exported also as CSV file.


XY SEMI
This software pack is provided with digital micrometers and it is used for assisted CHD case depth tests with automatic CHD graph generation.AUTO WELD
Easy testing on welded samples thanks to the predefined patterns templates and the drag positioning feature for groups of indents.AUTO GRAIN
Grain Size Analysis (ASTM E112 and EN ISO 643), automatic Spheroidal Graphite Nodule Analysis (ISO 945) and utomatic Phase Percentage AnalysisMODEL SERIES
Model WIKI 90 A WIKI 90 B WIKI 90 C
WIKI 90 CNC
Height capacity142 mm 130 mm 110 mm 110 mm motorized
Depth capacity163.5 mm 163.5 mm 163.5 mm 163.5 mm
Elevating spindleStandard Ultra-precise Ultra-precise Motorized
Turret (motorized)3 positions 6 positions
Objectives positions2 4
Indenters positions1 2
Automatic readingYes
AutofocusNo Yes
XY tableManual (option) Digital encoders Motorized
Standard load range100gf - 31.25 kgf 10gf - 31.25 kgf 10gf - 62.5 kgf
Feasible testsHV / HK / HB
Software for CHDNo Manual Semi-automatic Fully-automatic
Objective types210 210 / Infinite
TECHNICAL FEATURE
MODELWIKI 90 JS
StandardsDIN-EN-ISO 6506 / DIN-EN-ISO 6507 / DIN-EN-ISO 4545 / ASTM E-92 / ASTM E-384 / JIS B 7734
Loading forcesDual load cells and closed Affri system originator at high sensitivity 1000step per second 1 KHz)
AccuracyBetter than 0.1% on each load
Division1 μ/m scan over the entire stroke of the XY table Test load
10 g - 62.5 kg
Feasible testsVickers, Knoop, Brinell
Lens2.5x, 5x, 10x, 20x, 40x, 50x
Penetrator2 slots
Step turret6 slots
TurretHorizontal revolver turret pneumatic action including protection for objective against dust
LightSuper diffused XLED
Camera vision1/2" anti-glare CCD camera; 1.2 Mpixel (expandable on request)
SoftwareIn automatic and manual mode and scanning
Screen24” monitor with infinite colors and Super HD tones
Dwell time1 to 99.9 sec. programmable
Useful height199 mm (excluding table)
Useful reach160 mm
FocusInfinite definition
XY TableManual - 100x100 mm with 10 μm step
Indent readingManual focus with automatic and manual reading
Data outputRS 232 C - USB - Ethernet data output (others on request)
Loading capacity100 kg
Power supply110-220 V, 50 - 60 Hz, 400 VA
Weight45 kg
Dimension65 x 42 x 87 cm
OSWindows 10 (64 bit) - Reviews
-
Feature


