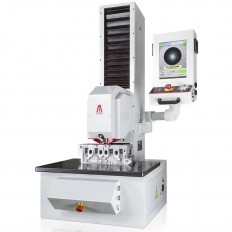
- Description
-
Details


FAST AND EASY MEASUREMENTS
To perform the test just act on the elevating screw and bring the specimen to make contact with the indenter. The hardness tester applies preload and load in automatic succession; within seconds the result appears.LOAD CELLS AND CLOSED LOOP (Pat. AFFRI)
Load forces are applied directly on the measuring axis through load cells and are electronically controlled in “Closed Loop” (Pat. AFFRI) with a frequency of 1 kHz (1000 input per second). There are no ratio load forces nor lever, eliminating problems associated with dead weight systems on traditional testers. This hardness tester is not affected by any structural deflection, misalignment or vibration and can also operate in an inclined position. It doesn’t need to be leveled.

DIGITAL DISPLAY AND SOFTWARE
Selection of hardness scales, dwell time, conversion data, return stroke, memory and storage of results, statistics, test temperature measure, calibration, system checkup, tolerance range, in-time results average, correction of round surface and automatic evaluation. Main control LCD panel 128x64 pixel in front of the measuring head for setup of test parameters, including powerful software and electronic.CLAMPING HOOD (OPTIONAL)
It assures a perfect locking of the specimen through the whole test cycle. No need of additional supports when testing long samples.


L.I.S.A. (OPTIONAL)
Laser pointing system (Pat. AFFRI)
Allows for a precise test positionpointing before the contact betweenthe indenter and the sample.Excellent solution for gear teeth andblade and cutting tools edges.OPTICAL SYSTEM (OPTIONAL)
Brinell and Vickers MEASUREMENTS (ISO 6506 - 6507 / ASTM E10 - E384)Rotating arm with self-alignment of the optical with the indentation axis. Automatic centering with no need to move the specimen. Interchangeable objectives: 1x 2x 3x 4x for 5x 10x 15x 20x and 15x eyepiece for manual measure, (total magnification: 75x 150x 225x 300x) and also camera available for auto measure.


NEW INNOVATION
250 DRM PC is a new model with touch screen monitor including the powerful software.
TOUCHSCREEN AND STATISTIC SOFTWARE
Large LCD multicolour touch screen 7.5” and a powerful panel PC with Windows® operative system. The user-friendly software is designed with easy setting parameters for measurement setup, statistics and data storage. Hardness scales can be quickly selected from large and clear tabs. Conversion scales, function for concave, convex and calibration off-set correction are always visible. Results are divided according to tolerances and can be viewed in three different types of graphs.


WK ACCESSORY (OPTIONAL)
Applicable to each hardness tester to transform them into universal hardness testers for Brinell, Vickers and Rockwell measurements. Suitable to measure any kind of component thanks to the automatic scanning of indentation by optic probe and the direct view of result on the LCD touch-screen. Data report can be created and exported.
WK accessory allows to make automatic tests for Brinell and Vickers scale. The automatic focus, the zoom, real magnification 25X and 50x give you perfect measurements. Check results and data on the touch-screen and export them through Windows multi language software.
TECHNICAL FEATURE
MODEL250 DRM 250 DRMC Fields of use
For all metals: iron, steel, tempered steel, cast iron, brass, aluminum, copper and metal alloys. Heat treatment, hardening, nitriding, cementation and hardfacing. Hard and soft plastics.Standards
EN-ISO 6506-2 / EN-ISO 6507-2 / EN-ISO 6508-2 / ASTM E10 / ASTM E18 / ASTM E103 / ASTM E384 / JISElevating screw stroke
0/215 mmDepth capacity 190 mm
Preload29.4 - 98.1 N (3 - 10 kgf) Test Load Rockwell: 588.4 - 980.7 - 1471 N (60 - 100 - 150 kgf)
Rockwell Superficiale: 29.42 - 147.1 - 294.2 - 441.3 N (3 - 15 - 30 - 45 kgf)
Vickers: 29.42 - 49.03 - 98.07 - 147.1 - 196 - 294.2 - 490.35 - 980.7 N (3 - 5 - 10 - 15 - 20 - 30 - 50 - 100 kgf)
Rockwell: 588.4 - 980.7 - 1471 N (60 - 100 - 150 kgf)
Rockwell Superficiale: 29.42 - 147.1 - 294.2 - 441.3 N (3 - 15 - 30 - 45 kgf)
Vickers: 29.42 - 49.03 - 98.07 - 147.1 - 196 - 294.2 - 490.35 - 980.7 N (3 - 5 - 10 - 15 - 20 - 30 - 50 - 100 kgf)
Brinell HBWT: 49.03 - 61.29 - 98.07 - 153.2 - 245.2 - 294.2 - 306.5 - 612.9 - 1226 - 1839 N - Optional 2452 N (5 - 6.25 - 10 - 15.6 - 25 - 30 - 31.2 - 62.5 - 125 - 187.5 kgf - Optional 250 kgf)Feasible tests Rockwell: HRC - HRA - HRD - HRB - HRF - HRG - HRL - HRM - HRR
Superficial Rockwell: HRN - HRT
Vickers: HV3 - HV5 - HV10 - HV15 - HV 20 - HV30 - HV50 - HV100
Rockwell: HRC - HRA - HRD - HRB - HRF - HRG - HRL - HRM - HRR
Superficial Rockwell: HRN - HRT
Vickers: HV3 - HV5 - HV10 - HV15 - HV 20 - HV30 - HV50 - HV100
Brinell HBWT: HB30 - HB10 - HB5 - HB2.5 MPa (F/D2)
Load accuracyBetter than 0.1 % - Reviews
-
Feature


