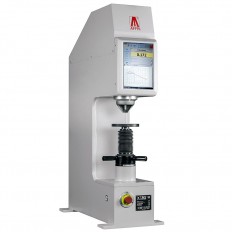
- Description
-
Details
TEST LOADS: from 10 to 3000 kgf (From 98,07 to 29421 N)
FEASIBLE TESTS: (Depending on the models, for more information see the table at the bottom):
Brinell HBW: 1/10 - 1/30 - 2.5/62.5 - 2.5/187.5 - 5/25 - 5/62,5 - 5/125 - 5/250 - 5/750 - 10/100 - 10/250 - 10/500 - 10/1000 - 10/1500 - 10/3000
Brinell HBWT: 2.5/62.5 - 2.5/187.5 - 5/125 - 5/250 - 5/750 - 10/500 - 10/1000 - 10/1500 - 10/3000
Rockwell: HRA - HRB - HRC - HRD - HRF - HRG - HRL - HRM - HRR
Vickers HV 3 - HV 5 - HV 10 - HV: 20 - HV 30 - HV 50 - HV 100 (Only indentation)
CLOSED LOOP TECHNOLOGY (Pat. AFFRI):
Load forces are applied through load cells and electronically controlled in “Closed Loop” with a frequency of 1 khz, assuring perfect linearity in every range. Range from 10 to 3000 Kgf. Results are not affected by any structural de ection, misalignment, vibration or problems associated with dead weight systems on traditional testers. The tester can also run in an inclined position.
EASY AND FAST AUTOMATIC MEASUREMENTS
Spin the leveling screw’s handle and bring your sample to make contact with the clamping hood blocking the piece. Press the START button and the measuring head approaches the sample, applies the load to perform the indentation and goes back upward; all in automatic succession without breaching a phase.
The measuring cycle is a fully motorized electronic system for automatic preloading, loading and measurements. AFFRI® System hardness testers achieve the highest level of loading, depth accuracy and measurement resolution available. Thanks to the AFFRI® System, the real indentation measurement is guaranteed without any external interference in any work environment condition.
SELF COMPENSATING AND CLAMPING SYSTEM (Pat. AFFRI)
When testing unstable samples or de ective parts, the AFFRI System will follow the sample and not lose contact, compensating any frame dflection during the test cycle. Accurate results are assured even with oiled, dusty or dirty pieces.
Secure contact with the specimen is always maintained, even in the unlikely event of any specimen movement during the operation cycle. No additional support accessories are required.
The clamping system assures perfect stability of any test piece throughout the test cycle.
MOTORIZED VERTICAL STROKE
The LD3000 measuring head is fully motorized with a vertical sliding stroke of 30 mm / 1.2”. When testing unstable samples or deflective parts, the measuring head will follow the sample without losing contact, compensating any frame deflection during the test cycle. Accurate results are assured even with oiled, dusty or dirty pieces. Easy and fast hardness measurements on pieces with different thicknesses without acting on the tester head or elevating screw.
The top surface referencing and the auto-compensation system minimizes errors caused by problems associated with dirt or scale. This reduces sample preparation time and increases both accuracy and speed.
LD3000
Semi-automatic Brinell hardness tester. Reading of indentation is made through standard microscope for Brinell and Vickers indentation reading (20x, div. 0,01 mm, scale 6 mm).
LD3000A
Automatic Brinell hardness tester with on-board LCD and portable probe. Real Brinell HBW in compliance with ASTM E10 and ISO 6506 to supply with BK30 Electronic microscope for Brinell and Vickers indentation autoreading and Tablet with Software.
The preinstalled software controls the whole instrument avoiding setting errors or operators mistakes: Indentation autoreading through camera and automatic readuot. Powerful software for test cycle managing and automatic indent analyzing. Wide settings parameters for measurement setup, image adjustments, statistics and data storage. 
LD3000B
Automatic Brinell hardness tester with depth hardness measurement for Brinell HBWT and Rockwell in compliance with ASTM E18 and ISO 6508. On-board LCD.
The preinstalled software controls the whole instrument avoiding setting errors or operators mistakes: Real Brinell HBW and Rockwell measurement in compliance with ASTM E18 E08 and ISO 6506 6508. Powerful software for test cycle managing. Wide settings parameters for measurement setup, image adjustments, statistics and data storage.TECHNICAL FEATURE
MODEL
LD 3000Standards
EN-ISO 6506-1 / EN-ISO 6507 / EN-ISO 6508-2 / ASTM E-10 / ASTM E-18 / ASTM E-384 / ASTM E-92
Indenter and clamping-hood stroke30 mm
Elevating screw stroke150 mm
Depth capacity190 mm Test loads
Brinell: 98.07-147.1-294.2-306.5-612.9-1839-2452-4903-7355-9807- 29421 N (10-15-30-31.2-62.5-187.5-250-500-750-1000-3000 kgf)
Rockwell (On request): 588.4 - 980.7 - 1471 N (60 - 100 - 150 kgf)
Vickers (On request): 98.07 - 147.1 -294.2 - 490.3 - 980.7 N (10 - 15 - 30 - 50 - 100 kgf)Feasible tests
LD 3000: Only indentation
LD 3000 A: Automatic indentation reading with onboard LCD and portable probe
Brinell HBW 1/10-1/30-2.5/62.5-2.5/187.5-5/25- 5/62,5- 5/125-5/250-5/750-10/100-10/250-10/500-10/1000-10/1500-10/3000
Vickers HV 3 - HV 5 - HV 10 - HV 20 - HV 30 - HV 50 - HV 100 (Only indentation)
LD 3000 B: Automatic Brinell HBWT and Rockwell measurements
Brinell HBWT 2.5/62.5 - 2.5/187.5 - 5/125 - 5/250 - 5/750 - 10/500 - 10/1000 - 10/1500 - 10/3000
Rockwell HRA - HRB - HRC - HRD - HRF - HRG - HRL - HRM - HRR
Vickers HV 3 - HV 5 - HV 10 - HV 20 - HV 30 - HV 50 - HV 100 (Only indentation)
AccuracyBetter than 0.5 % - Reviews
-
Feature


